Ever faced a messy room and felt unsure where to begin? Tackling clutter and dirt can feel overwhelming, but here’s a simple trick to kickstart your cleaning motivation: snap a photo before you clean!
This small step can transform the way you approach cleaning. Whether you’re preparing for guests, sprucing up your home for a sale, or embarking on a seasonal decluttering spree, a quick “before” photo offers a fresh perspective and makes the process more satisfying.
Let’s explore how taking photos can motivate you, protect your belongings, and even help you share your progress. You’ll also find practical tips for creating bright, sharp interior photos that make comparisons truly rewarding.
Why “Before” Photos Are More Than Just a Trend
Spot the Problem Areas
Sometimes, we’re so used to our surroundings that we don’t notice the mess building up. A photo offers a new perspective, making problem spots like cluttered shelves or dusty corners impossible to ignore.
With a quick glance at the image, you can pinpoint areas that need attention, plan your cleaning strategy zone by zone, and prioritize tasks, from decluttering the desk to scrubbing the kitchen floor. This “big picture” view helps you focus your energy where it’s needed most.
Celebrate Your Progress
Cleaning can feel like a thankless task until you see the transformation. Comparing a “before” photo with the finished space is a fantastic morale boost. That visual evidence of your hard work makes the effort worthwhile and motivates you to keep going.
Feeling proud of your progress? Share your before-and-after photos on social media to inspire others, start a DIY or decluttering blog to document your journey, or use them to track your progress over time.
Safeguard Your Belongings
Taking photos isn’t just motivational—it’s practical too. A “before” shot creates a record of your space. If something goes missing or gets damaged during cleaning (especially when working with professional cleaners), you’ll have a clear reference.
Even if you’re doing the cleaning yourself, photos help you remember where everything belongs. No more guessing if the vase was on the side table or the bookshelf!
How to Create Stunning Before-and-After Photos
Taking great photos is key to making your comparison worthwhile. Here are a few tips to capture your space in the best light:
- Lighting Matters: Use natural light whenever possible. Open curtains and shoot during the day for bright, clear images.
- Angle Your Shots: Stand at the same angle for both “before” and “after” shots to make the differences more noticeable.
- Declutter First: Remove small distractions like stray cords or loose papers for a cleaner shot.
- Keep it Steady: Use a tripod or a flat surface to avoid blurry photos.
Level Up Your Photos with Editing
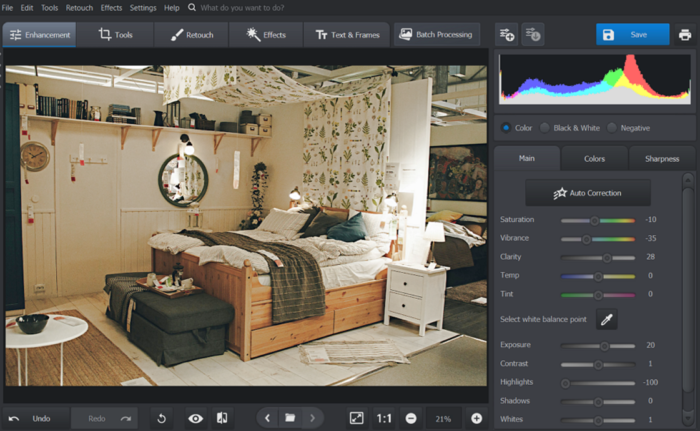
Here’s where the fun starts. A well-edited photo doesn’t just look better—it also makes the differences more noticeable. That’s where tools like PhotoWorks come in. This user-friendly photo editor can make your before-and-after comparisons pop with a few simple tweaks: how to remove light glare from a photo, how to brighten a dark picture or how to crop out unwanted areas won’t be a problem for you anymore.
Some features of photo editing software that is perfect for editing interior photos:
- Remove Glare and Shadows: Say goodbye to those annoying reflections and shadows that ruin your shot.
- Correct Colors and Exposure: Make your photos look vibrant and true to life.
- Sharpen Blurry Photos: Repair out of focus pictures to create neat and crisp images showing every detail of your home interior.
- Crop and Straighten: Frame the shot better and fix any tilted lines. Align your photos and crop out distractions like table edges or open drawers.
- Add Filters: Enhance the mood of your photo with subtle or dramatic effects.
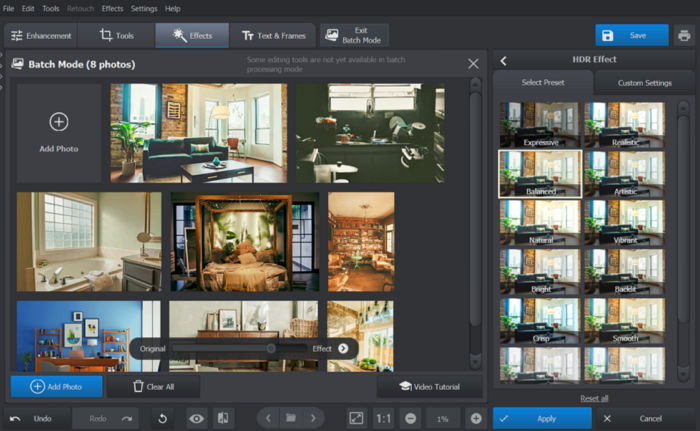
- Batch Editing: Tidy up multiple photos in one go, saving loads of time.

How to Batch Edit Interior Photos
Editing a single photo is fun, but batch editing is a lifesaver when you have lots of pics. Here’s a quick guide to editing your photos in:
- Open your editor. Download your editor of choice and install it on your computer.
- Select Batch Processing. Find this feature in the top menu—it’s super easy to locate.
- Add your Photos. Click on the Add Photos button and select as many files as you need to edit at once.
- Apply Basic Adjustments. Use automatic and manual tools to fix brightness, contrast, sharpness and colours across all the selected photos.
- Add Filters. Choose a filter that enhances your photos without overdoing it. You can apply toning, lighting, sharpening, HDR, complex enhancement and lots of other effects to make all of your photos look brighter and clearer in a click.
- Save All Changes. When you’re happy with the edits, save the photos as a group in a folder of your choice.
Boom—you’re done in minutes!

If you’ve taken a series of photos, batch editing is a huge time-saver. With tools like PhotoWorks, you can upload multiple images at once, apply adjustments like brightening, sharpening, or toning across all photos, and save your edits as a group to ensure consistency.
This feature is especially helpful for larger cleaning projects where you want to document the transformation of an entire home.
Final Thoughts
Taking a photo before you clean is a simple yet powerful habit. It helps you see your space clearly, motivates you with visible progress, and ensures you can easily return everything to its place. Plus, with a few basic photo editing skills, your before-and-after shots can become a source of pride and inspiration.
Next time you’re gearing up for a big cleaning session, grab your phone or camera. Snap a quick “before” photo, tackle the mess, and bask in the satisfaction of a job well done. You might even find yourself looking forward to your next decluttering project!

